
This guide is intended to detail the steps performed to setup my homelab configured as a hybrid domain environment with Active Directory and Entra ID synced using Entra Connect Sync with Password Hash Synchronization (PHS) to have for development, learning, and practicing domain administration. This will be Part 1 of posts about my homelab configuration journey.
This configuration will include the following virtual machines:
- Two (2) Domain Controllers running Windows Server 2025
- DCs will have the following roles installed:
- AD DS
- DNS
- DHCP
- RRAS (only on DC1)
- DCs will have the following roles installed:
- One (1) Application Server for Entra Connect Sync running Windows Server 2025
- One (1) Windows 11 Enterprise for user experience perspective
For networking, I went with a 172.16.0.x network for the homelab internal connection. This can be 192.168.x.x or 10.x.x.x if you want for your setup. For network addressing convention, I went with this:
- .1-.9 –> Core Servers (DC, DNS, DHCP, etc)
- .10-.19 –> Other Servers (Application Specific)
- .100-.200 –> DHCP Scope
For this guide’s homelab, I am using a Dell Precision 7520 with Windows 11 Professional and Hyper-V feature added to the host. The laptop has been upgraded to 32 GB RAM and has an Intel Core i7-7820HQ CPU @ 2.90GHz. It is from 2016-2018 timeframe and still works great for a homelab test type environment.
I also recommend purchasing a TLD (eg mydomain.com or mydomain.net) for your homelab especially for DNS related items and for adding it to your Microsoft tenant for the cloud side of our hybrid environment. This should only cost you ~$10-15 depending on what TLD you choose.
ISO Setup
- Download Windows Server 25 and Windows 11 ISOs
- Windows Server 2025: https://www.microsoft.com/en-us/evalcenter/download-windows-server-2025
- Windows 11 Enterprise: https://www.microsoft.com/en-us/evalcenter/download-windows-11-enterprise
- Store in designated folder locally or on your network
- Evaluation versions of ISOs are valid for 180 days and can be re-armed up to five days for a total of three years
Hyper-V Setup
Hyper-V Manager
- Configure virtual switches in Virtual Switch Manager
- Internal: define name (eg Internal or IntNet), assign Connection Type as “Internal Network”
- External: define name (eg External or ExtNet), assign Connection Type as “External Network” with your ethernet or wifi adapter selected, enable “Allow management operating system to share this network adapter”

- Virtual Machine settings adjustments
- Disable Checkpoints feature
- Windows 11 will require you to enable Trusted Platform Module (TPM) under Hardware > Security

Virtual Machine Setup
Domain Controllers
- Setup DC1 virtual machine
- Configure VM settings:
- 4096 MB RAM
- 80 GB Drive
- 2 vCPU
- Internal and External virtual switch added
- Attach ISO for install, Remove ISO after install
- Assign static IP information to internal v-network adapter:
- IP: 172.16.0.1
- SM: 255.255.255.0
- GW: empty
- DNS: 172.16.0.1, 127.0.0.1
- Apply Windows Updates
- Rename system
- Install Active Directory Domain Services (AD DS) role
- Install DNS role
- Install DHCP role
- Install Remote Access role > RAS/NAT and Routing (RRAS)
- Promote server to domain contoller
- Configure AD DS:
- Add new forest
- Define root domain name
- Define DSRM password
- Define NetBIOS domain name (default is likely just fine)
- Server reboot
- Create new O/U for Admins
- Create new user object for yourself with admin access (eg Admin-Name or ADM-Name)
- Add to groups for admin roles: Domain Admins, Enterprise Admins, Schema Admins
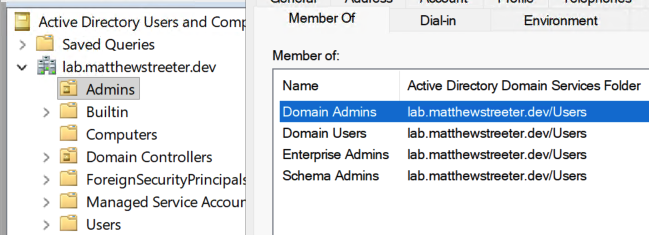
- Disable built-it Administrator account so you can use your new Admin account we created
- Configure Remote Access:
- Enable RRAS for Network Address Translation (NAT) on the External virtual switch
- Configure DHCP:
- Add new scope (.100-.200)
- Activate scope

- Configure DNS:
- Add external DNS servers (or your actual network’s gateway) in Forwarders tab
- Add Reverse Lookup Zone, Primary AD-Integrated IPv4, Default options, 172.16.0 for Network ID
- Ensure Forward Lookup Zone for domain is set to Secure Only for dynamic updates in the General tab
- Enable “scavenge stale resource records” setting, default is 7 days
- Configure VM settings:
- Setup DC2 virtual machine
- Configure VM settings:
- 4096 MB RAM
- 80 GB Drive
- 2 vCPU
- Internal virtual switch only added
- Attach ISO for install, Remove ISO after install
- Assign static IP information to internal v-network adapter:
- IP: 172.16.0.2
- SM: 255.255.255.0
- GW: 172.16.0.1
- DNS: 172.16.0.1, 127.0.0.1
- Apply Windows Updates
- Rename system
- Install Active Directory Domain Services (AD DS) role
- Install DNS role
- Install DHCP role
- Install Remote Access role > RAS/NAT and Routing (RRAS)
- Promote server to domain contoller
- Add to existing domain forest
- Configure DNS:
- Ensure that DC2’s primary DNS is set to DC1 IP
- Configure VM settings:
- Configure DC1 virtual machine
- Adjust DC1’s primary DNS to be set to DC2 IP
- Configure DHCP:
- Update Scope Options, 006 DNS Servers – add DC2 IP address
- Configure Failover, right-click IPv4 Scope, select DC2 as your partner, define a relationship name, set a shared secret, set switchover interval (60 min)

Other Servers
- Setup APP1 virtual machine
- Configure VM settings:
- 4096 MB RAM
- 80 GB Drive
- 2 vCPU
- Internal virtual switch only added
- Attach ISO for install, Remove ISO after install
- Assign static IP information to internal v-network adapter:
- IP: 172.16.0.10
- SM: 255.255.255.0
- GW: 172.16.0.1
- DNS: 172.16.0.1, 127.0.0.1
- Apply Windows Updates
- Rename system
- Join to domain
- We will come back for the Entra Connect Sync configuration and setup
- Configure VM settings:
- Setup WIN11 virtual machine
- Configure VM settings:
- 4096 MB RAM
- 80 GB Drive
- 2 vCPU
- Internal virtual switch only added
- Attach ISO for install, Remove ISO after install
- Apply Windows Updates
- Rename system
- Join to domain
- Configure VM settings:
- Final Overview of Hyper-V Manager


Active Directory Setup
Admin Accounts
This was completed in the initial setup for AD DS to create an admin account for yourself to stop using the built-in Administrator account.
User Accounts
- It is best practice to not use a DC for this step so we will use our Windows 11 VM and our Admin User account.
- Install Active Directory (AD) PowerShell module using an elevated PowerShell session and running this:
Add-WindowsCapability -Online -Name Rsat.ActiveDirectory.DS-LDS.Tools~~~~0.0.1.0. - Using PowerShell, create our users accounts main organizational unit (for example named “Users” or “Enterprise”) and then sub department organizational units (script creates 6 departments) using the script found here: https://github.com/matthewrstreeter/ad/blob/main/CreateOUs.ps1.
- Using PowerShell, create our security groups based on department name using the script found here: https://github.com/matthewrstreeter/ad/blob/main/CreateGroups.ps1.
- Using PowerShell, create our initial batch of user accounts (script creates 4 users with random names per department) in the newly created users O/U based by their department using the script found here: https://github.com/matthewrstreeter/ad/blob/main/CreateUsers.ps1.


